


The Background
In March 2018, I was playing volleyball and broken my 5th metatarsal, a small, weight-bearing bone in my foot. When I went into for an X-ray, the doctor told me that it was the most frequestly broken bone in the foot and that “95% of people heal up just fine in about 3 months.” I felt pretty good knowing that I just had to reduce my use of the foot, go to PT, and wait.


Three weeks later I returned to his office for another X-ray of the broken bone. My doctor looked at it for a bit, turned to me, and said, “No worries. 85% of people heal up just fine in about 3 months.”
85%? I thought it was 95% three weeks ago?
It turns out, I’m in that top 5% of people. Yay me.
Present Day
Months went by and the X-rays continued to show no healing of the bones so we scheduled surgery to put a small screw into my foot. And YES, like a true geek, I asked for the screw to be made out of Vibranium or Unobtainium so that I could get some super powers. Unfortunately, the doctor had not heard of either of these metals (sorry Marvel Universe).
I’ve used forearm crutches for years and know their pros (easy and quick) and cons (hurts arms/hands, can’t carry anything, and is exhausting). When I first broke my foot, I borrowed a knee scooter from a friend. While it worked, my thighs and back hurt from using it, I couldn’t carry anything, and I almost face-planted after taking corners too quickly several times.
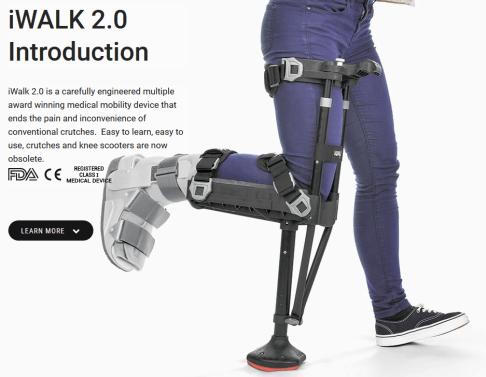
I needed something else for my 8 week recovery where I wouldn’t be able to put weight on my foot. Enter the iWALK 2.0 (https://iwalk-free.com/product-introduction/).
iWALK 2.0
The iWALK 2.0 is a knee crutch (shown below). It straps onto your leg and allows you to move around like you are on a “pirate peg leg”. I bought one and, within 5 minutes (I was a natural!), I was walking around on it.

It worked great!
- I could carry things in my hands!
- I could use stairs and escalators.
- I didn’t feel off-balanced.
After using it for a bit, I purchased an additional knee pad (https://store.iwalk-free.com/iWALK20-Spare-Parts_c_8.html) for it so that the pressure on my knee would be less. It worked!
I cruised around the office with it on but…but…it was missing something….BLING!
The Bling
The truth is that I knew I was going to be in this iWALK during the BSidesLV, BlackHat, and Defcon cyber security conferences and that I’d be around a large number of, well, geeks like me. So I wanted something technical to point at.
Some lights.
Some…sounds.
Something. Anything!
Adafruit.com is my preferred site for “electronic bling”! I have come to love their products and the helpful tutorials they have to get me started.
I wanted to add lights and other things to the iWALK but didn’t want to go full Raspberry Pi on it. I was not thrilled coding up an Arduino for the task either so I scoured the Adafruit web page hoping for inspiration. It did not disappoint.
The Circuit Playground Express
The Circuit Playground Express (https://learn.adafruit.com/adafruit-circuit-playground-express?view=all) is a full-featured, low-cost ($25), device that was perfect for my needs. Check out the specs below (from Adafruit’s site):


Oh, I was in heaven. Did you see the 10 NeoPixels that are built-in to the device? Sound and light sensors. Accelerometer! Speaker! All for $25?
I was happy and resigned myself to learning the Arduino code necessary for this device…but wait. The Circuit Playground CAN be programmed using Arduino code. But it also can be programmed using CircuitPython and via a web page (https://makecode.adafruit.com/). Hmmm…. via a web page. Let’s look into this more.
See, I love Python as much as the next person, but in my creations, I love being able to explain to “normals” (non-geek people like my family and people I meet outside of work and cons) how things work. So not having to show them IDEs or Vim and long lines of text code is helpful to backing up my claim that “anyone can do this”.
The “Programming” Web Site
Let me show you how absolutely easy Adafruit has made programming these Circuit Playgrounds. In a separate tab or browser window, go to https://makecode.adafruit.com/.
Press the “New Project” button (shown below).


Now you are at the simulator screen. You don’t even need to buy a Circuit Playground Express to play around with it!
- Arrow 1 below shows the simulated device that you can press the buttons on, watch the LEDs light, and listen to.
- Arrow 2 shows how you drag a puzzle piece from the palette over to arrow 3 in the code area. Adafruit has a huge number of blocks that can be used. If you (or your kids) have ever used MIT’s Scratch (https://scratch.mit.edu/), then you will be right at home dragging puzzle pieces from the left to the right and putting them in loops and button press objects.
- If that isn’t enough for you, you can customize what your code does using Javascript. Arrow 4 translates the blocks to Javascript code (and translates Javascript to Block code).


Oh this was not only going to be fun but easy too!!!!!! Every time I made a change to the web page code by dragging objects into the loops on the right, the simulator on the left reset and I could run the code in the virtual environment.
Getting the code from the web site to my device was easy too. All the directions are on the Adafruit page noted earlier (https://learn.adafruit.com/adafruit-circuit-playground-express?view=all#adafruit2-windows-driver-installation). Just download the file from the web site and drag it onto the USB drive for the device. Done!
More Bling!
The Circuit Playground Express was nice as the heart/brains of my creation, but I needed other things.I wanted to be proud of this creation. I wanted LOTS of lights, sounds, WiFi, and so much more!
I needed to go shopping:
- 1 meter Adafruit Mini Skinny NeoPixel Digital RGB LED Strip – 60 LED/m – BLACK – https://www.adafruit.com/product/2964?length=1
- 1 NeoPixel Jewel – 7 x 5050 RGB LED with Integrated Drivers – https://www.adafruit.com/product/2226
- M3 screws, bolts, washes, locknuts – https://www.amazon.com/gp/product/B01K6NNYZ8/
- 1 HiLetgo 2pcs ESP8266 NodeMCU LUA CP2102 ESP-12E Internet WIFI Development Board- https://www.amazon.com/gp/product/B010N1SPRK/
Already had some of the other things I’d need:
- Wire
- Solder
- Connectors
- Heat shrink tubing
- Velcro
- 3D printer for the case (although later I found out that Icebreaker Mints cases are the perfect size for this!)
- USB phone chargers – 4, 2600mAh (I wanted them to be able to be cycled in and then recharged)
The Plan
I figured I’d:
- Mount the NeoPixel Jewel in the middle of the front of the brace.
- Cut the 1m of NeoPixel strips into 2, .5m strips and run them along either side of the front of the brace.
- Mount the USB power supply on top with the switch facing up so I could power on and off easily.
- Mount the ESP8266 next to the USB power supply as there was nothing to really do to that aside from turn it on.
- Mount the Circuit Playground Express in the 3D printed case I modified from https://www.thingiverse.com/thing:2585702. I used the tinkercad.com web site to add some holes to the walls of the case to allow for wires to pass through.
- The M3 screws, bolts, and stuff were to secure the wires from the various NeoPixels up to the Circuit Playground Express.
- Create a program where I could control the different light sequences and such from the buttons on the Circuit Playground Express.
The Outcome
I had so much fun playing around with this over weeks. I still tinker with pieces of it or the code. Here’s a short video with some of the features displayed.

What else does it do?
- There is a sound meter that listens on the Circuit Playground Express and then graphs the sound levels down the NeoPixel strips on the legs (louder sounds go closer to the ground).
- It makes the Mario Bros “cha-ching” sound that Mario makes when he collects a coin when I step (generate a G-force > 1G).
- The ESP8266’s sole purpose is to broadcast a WiFi access point with a specific name. Not going to tell you what it is. Hopefully, people at the cons I’m going to will see it and come find me.
- I have it configured so that the last 10 lights on each NeoPixel strip light up white to act as a headlight so I can see where I’m walking at night or in clubs.
- I added (and then removed) som EL Wire (https://learn.adafruit.com/el-wire/overview) from the bottom. Still on the fence about putting it in there.
The code for this got quite complicated but I stuck true to my “I wanna do it all in the makecode website”. Below is a picture of the code and a link to it (https://makecode.com/_by6Prk8ptioK). As I mentioned, this is a work in progress, and I’m constantly tweaking the codes. That link and the pic below are for a static set of the code.


Pictures of the project pieces are below.


The Conclusion
I’m looking forward to showing these technologies off to people over the coming 8 weeks of use. Hoping I’ve maybe inspired you to go grab a Circuit Playground Express or write some MakeCode. Let me know!