
The other day I came across a database dump that had user login names and hashed passwords. I had over 1,000 of them and they were SHA256 hashes. I remembered that there was some tool that could perform Google look-ups for hashes and asked the Twitter-verse for help. Wouldn’t you know that the first person to reply was Tim Tomes who said that the bozocrack module inside recon-ng could do exactly what I wanted. Excellent!
This blog post is a walk-through of that process.
Pulling our Hashes from a File
First thing we need to do is get the hashes. Let’s say I have all my hashes in a files called, oh I don’t know “hashes” and I’ll put them on the Desktop of my Kali linux system. So the file will be located at /root/Desktop/hashes.
Launch recon-ng and create a workspace named “hashes” (or whatever you want) for this work. Workspaces allow us to logically partition our work so that if we have several projects or customers that we are doing work for simultaneously, their data doesn’t get co -mingled.
 |
| recon-ng launched from inside a terminal |
Now let’s tell recon-ng to load the bozocrack module. Since it is the only module with “bozo” in it, we can use a shortcut and just type load bozo as shown below. I also used the show info command to get information about the module I just loaded.
 |
| Loading the bozocrack module and showing the info |
The important part of this step is to see all of the options that you can configure. In this case the SOURCE variable is the only option to modify. By default, the module pulls information from the credentials table inside the recon-ng database. But we can tell it to use a different location as the source of our hashes. Let’s do that first.
We know from above that our file with the hashes is at /root/Desktop/hashes. We change where the module looks for the source using the set command: set SOURCE /root/Desktop/hashes (as shown below).
 |
| All set to run the bozocrack module using the hashes file |
At this point, we just type run and grab a $cold_beverage. The module will make Google queries for each hash in the file you specified and it’ll display the results on the screen. Below is what mine looked like once it finished.
 |
| bozocrack module output |
You can see that the hashes it found a match for start with a green “splat”/asterix [*]. Also note that there were three types of hashes in my file: MD5, SHA1, and SHA256. Pretty cool that the module just took them all and didn’t make me separate them into separate files. +1 for recon-ng
So that is the easy way for doing the lookups. You can easily scrape the terminal window screen and copy all the found hashes into a text editor for post-processing. That works….but I’m a lazy guy. I like to have my tools do the work. So, let’s do it another way too.
Using the Internal DB
As I mentioned above, recon-ng maintains a database for its findings. To see all the tables and such, type show schema and they will appear.
We are going to be storing our password hashes in the hash column of the credentials table. First thing I do is to import all my hashes into the DB using the import/csv_file module. Just type use import/csv and hit enter (since the csv_file is the only file with CSV in it inside the import path, you don’t have to complete the whole name. Like I said, I’m lazy!). Again I like doing a show info to see what options there are.
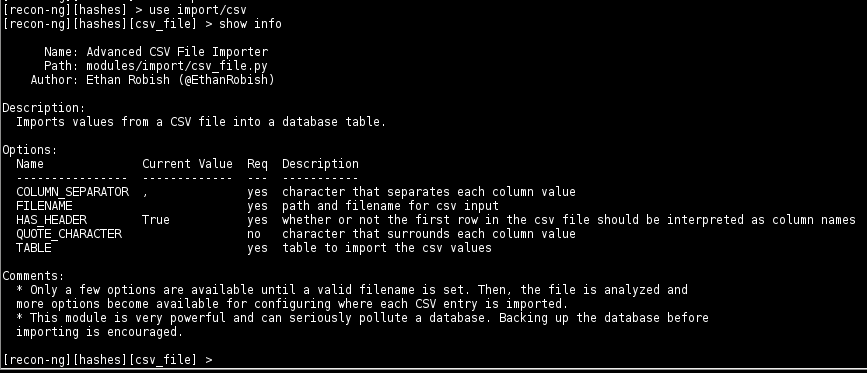 |
| Import/csv_file module |
OK, so we need to set the FILENAME option (set FILENAME /root/Desktop/hashes) and also the TABLE (set TABLE credentials). Now that we have those fields entered, if we do another show info we can see that there is now another option to change.
UPDATE – So I originally posted this with the content directly below this. The author of the csv_file module, Ethan Robish (@EthanRobish) noted that I messed up (which I appreciate!). Turns out I had the HAS_HEADER option set to TRUE (see the pic below). So my first row of the file became the “header” of the column and because of this, was never looked-up by the bozocrack module later. So, please pay attention to the HAS_HEADER option and set it to TRUE if your data has a header and FALSE if it does not. Once again, thanks Ethan for helping maintain the accuracy of this post and also for actually reading it! 🙂
See the “CSV_####…” column in the picture below? recon-ng is telling us it found content and wants to know where to put it. So we type set CSV_[ENTERTHENUMBER] hash as shown below.
 |
| Import/csv_file module with column recognized |
Now we have to go back to the bozocrack module (load bozocrack). Since we ran the module already using the SOURCE of a file, we’ll need to switch from the file for the SOURCE to the default (set SOURCE default) as the default uses the contents of the DB. Oh, want to check if your hashes loaded OK? Type show credentials and you’ll see the hashes in their proper column (below).
 |
| Credentials table before bozocrack |
OK, let’s kick this off using the run command and let ‘er rip. We will see the same output from when we ran the bozocrack module above but this time the bozocrack module will store the results in the DB. To show this, just type show credentials again and you should see more of the columns filled out (like the pic below).
 |
| Credentials table after bozocrack |
Yay! We got them in the DB but how to we get them out? Of course there is a module for that. Type load reporting/csv to load that module. show info will tell you what options there are. We see (below) that we need to alter the FILENAME (set FILENAME /root/Desktop/recon-ng_hashes_out) and TABLE (set TABLE credentials) and then type run. Magic!
 |
| Using the reporting/csv output module |
On your desktop should be a CSV file with your hashes, what type of hashes they are, and the cleartext passwords in it (like the one below).
 |
| Exported CSV report from recon-ng |
Hope this was helpful!